Overview
The Multi-Graph page allows data from several different Transmitters to be graphed together simultaneously.
Features
- Multi-graph current and Historic Data on the same graph
- Multi-graph multiple periods and tasks
- Multi-Graph current and removed Transmitters on the same graph
- Create unique Filters that can be saved and used at a later date
- Edit/Delete Filters
Note: The trace colours are fixed by the layout of the graph. If the chosen channels have too similar colours, it may be possible to add or remove Transmitters so that colours are more evenly distributed….
The Transmitter Detail View is spit into the following sections:
- Multi-Graph First Time Use
- Multi-Graph Options
- Create New List
- Save My First Filter
- Edit Existing Filter
- Delete an Existing Filter
- Printing Multi-Graph
- Calendar
- Graph Data
Multi-Graph First Time Use
Multi-Graph is accessed by selecting the Multi-Graph Tab from any other Tab.
The first time that Multi-Graph is selected there will be no Multi-Graph to view. However there will be a list of Transmitters as based on your current filter. The list of Tasks and Periods will be the current Task and Period for the Transmitters for today.
The Multi-Graph is as shown below.

Figure 1 – Multi-Graph My Filter View
Multi-Graph Options
The following Multi-Graph options are available
| Create New List | From the drop down list select Create New List to generate a new Multi-Graph Filter |
| Edit | Select Edit to edit the current Multi-Graph Filter. Not available until the first Multi-Graph Filter is created. |
| Calendar | Select Calendar to choose the period of time over which you wish to graph data. |
| Graph Data for Date | Click Graph Data for the chosen period. |
| Printable Version | Click Printable Version to bring up a version of the Multi-Graph with Table suitable for printing. |
Create New List
Select Create New List from the drop down to bring up this dialogue.
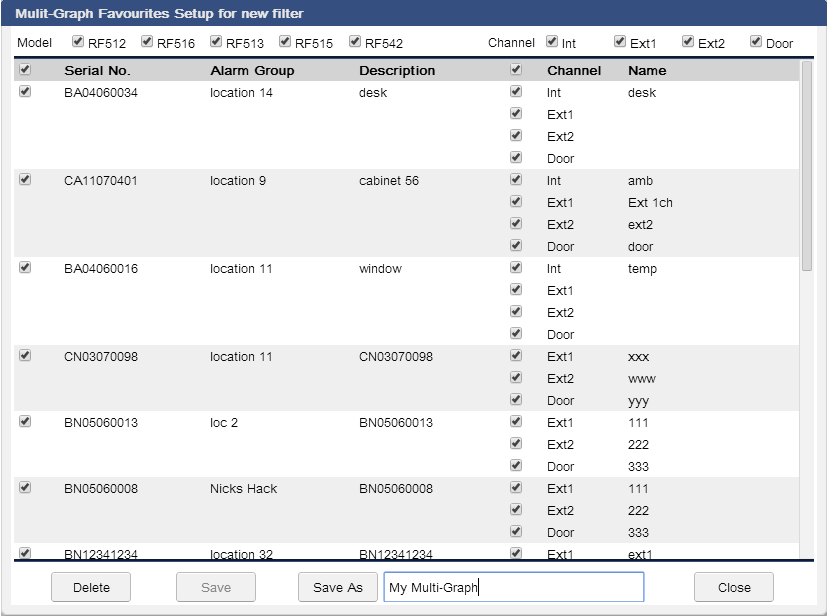
Figure 2 – Multi-Graph Create New List
The list as displayed, is as per the logged-in users’ My Filter selections, including the selected locations and the order in which Transmitters are displayed. If a Transmitter or Alarm Group is not shown, then visit the My Filter settings and make changes. By using the model tick boxes along the top of the dialogue it is possible to filter the list further. The options are as follows:
| RF512 | Tick to show all RF512s. Untick to remove RF512s from the list. |
| RF513 | Tick to show all RF513s. Untick to remove RF513s from the list. |
| RF515 | Tick to show all RF515s. Untick to remove RF515s from the list. |
| RF516 | Tick to show all RF516s. Untick to remove RF516s from the list. |
| RF542 | Tick to show all RF542s. Untick to remove RF542s from the list. |
Note: It is not possible to un-tick all the models. At least one model must be selected.
By using the Channel tick boxes along the top of the dialogue it is possible to filter the list further. The options are as follows:
| Int | Tick to select all Internal Channels. Untick to remove Internals from the Filter |
| Ext 1 | Tick to select all External 1 Channels. Untick to remove External 1 from the Filter |
| Ext 2 | Tick to select all External 2 Channels. Untick to remove External 2 from the Filter |
| Door | Tick to select all Door Channels. Untick to remove Door from the Filter |
It is possible to de-select all Channels using this filter. This allows for individual channels to be selected.
By using the tick-boxes in the grey banner it is possible to globally select either all Transmitters or all Channels remaining once the filters have been set above.
If you un-tick an individual Transmitter from the list, then the channels pertaining to this Transmitter will also be deselected.
Save My First Filter
For a new Filter it must be given a name before it can be saved.
Enter your Filter Name in the box provided, and click ![]() to save, close and select your new Filter, or
to save, close and select your new Filter, or ![]() to close without saving.
to close without saving.
Edit an Existing Filter
Once you have at least one new Filter, you can then edit the Filter.
Select the Filter you want to edit from the drop down list, and select Edit.
The dialogue will appear, and all edit options will be available as above.
Click ![]() to update the current Filter or enter a new name and selected
to update the current Filter or enter a new name and selected ![]() to save a new Filter, or
to save a new Filter, or ![]() to exit without saving.
to exit without saving.
Delete an Existing Filter
Any Filter can be deleted. To delete a Filter select the Filter from the drop down list and select Edit. If you wish to delete the Filter, click ![]() and the Filter will be deleted and the dialogue will close. If you do not wish to delete the Filter then select
and the Filter will be deleted and the dialogue will close. If you do not wish to delete the Filter then select ![]() to close without deleting.
to close without deleting.
 | Note: All Filters are User specific. So if more than one user wants to see the same Multi-Graph then they will need to log-in and create the filter themselves. There is no limit to the number of filters you can store, but it is recommended to only store a small number for the sake of ease of use. |
Printing Multi-Graph
Click Here for a Knowledgebase Article on Printing with M9 including Multi-Graph
Calendar
Click on ![]() to bring up the calendar dialogue, see below…
to bring up the calendar dialogue, see below…

Figure 3 – Multi-Graph Calendar
Simply click on the date range you want by selecting two dates. The selection will automatically determine the start and end date. You can also select dates over the end of year, by selecting the first date, and then using the year drop down, and selecting another date. If you want to simply graph a single month then select a month by clicking on the month name.
Graph Data for Date
Once you have made the selection of Dates from the calendar the graph date button will represent the dates selected.
![]()
Simply click the button to draw the Multi-Graph.
| Note: The Graph will be drawn at the top of the page, and the Table at the bottom will take up a smaller amount. You can increase the size of the table at the bottom by adjusting the page splitter. |