This knowledge base article offers guidance on Network Requirements and Settings for the RF300 Diligence WiFi sensor products.
What Network Requirements are there to use the RF300 Diligence WiFi Sensor Products?
The RF300 Diligence data logging sensors require an 802.11b compatible network and support the following encryption methods:
- No authentication or encryption – not recommended
- WPA/WPA2 Pre-shared key (PSK) — recommended
- WPA/WPA2 Enterprise – see below for more information
- WEP – 64bit or 128bit encryption. Requires WEP passkey in hexadecimal rather than ASCII passphrase.
For Loggers sold before July 2016 The WiFi Sensors will only operate on an 802.11b network using data rates of 1,2,5.5,11 Mb/s. Wireless access points must be configured to allow 802.11b traffic (not g or n only modes).
For Loggers sold from July 2016 onwards Comark has upgraded the Diligence WiFi Data Logger range from ‘b’ (IEEE 802.11b) to ‘bgn’ (IEEE 802.11b/g/n) WiFi compatibility.
How do I tell them apart from the old versions?
Telling them apart is straightforward. The part number for the logger can be found on the rear of the logger
along with the MAC Address which, for all ‘bgn’ enabled products is 98:8B:AD:20:00:00 -> 98:8B:AD:2F:FF:FF
By default the WiFi Sensors will obtain an IP address via DHCP, this is normal for most networks. The IP address can also be manually configured – see below for more information.
When using the PC software the sensors must be connected either wired or wirelessly to the same network and use the same IP address range as the PC.
If the software is running on a virtual machine it may be given a different IP address to the host PC. It will need to be given an IP address that is in the same range as the WiFi Sensors.
If you have multiple network connections on the PC, the software may not be able to automatically choose the one which the WiFi Sensors are connected to – see below for more information.
When using the Comark Cloud service the sensors and the PC do not need to be on the same network but both require an internet connection during setup.
Wireless access points must have wireless isolation or guest modes disabled to enable communication between devices.
Corporate networks may need additional configuration to allow communication between the sensor and the PC.
MAC Address filtering on the access point must be disabled or the address of the sensors included in the allowed list. The MAC Address can be found on the serial number label on the back of the unit.
How do the RF300 Diligence WiFi Sensor Products communicate on the network and what firewall settings may be required?
The WiFi Sensors communicate using different methods depending on whether they are connected to a local PC or to the Comark Cloud.
All communication is initiated by the WiFi Sensors themselves. While not communicating, the devices are in a low power mode with the radio module turned off.
Local PC
The Firewall must allow full access to the WiFi Sensor Software, failure to do so will prevent the sensors from communicating.
From Application Firmware version 3.xx onwards, the WiFi sensors primarily use TCP port 10080 to communicate with the PC Software. In addition they use UDP broadcast packets on UDP ports 1024 and 8010 for alarm notifications and discovery of a PC once TCP connection has been lost. Any firewalls running on the PC will need the TCP and UDP ports open for correct operation.
Cloud Service
In order to set up the WiFi Sensors on the Cloud, both the PC Software and the Sensors require an internet connection. The PC Software connects to the Cloud via a HTTPS connection in order to set up the sensor. This is only required during initial configuration. The WiFi Sensors communicate with the Cloud using TCP port 14354. Most domestic routers do not have restrictions on outbound TCP connections but corporate networks may require an exception in the router/firewall.
UDP Broadcast
Communication between the WiFi Sensors and the RF324 WiFi Alarm unit is achieved using UDP broadcast as the sensors do not have knowledge of how many RF324’s are listening on the network. It is also used by the WiFi Sensors when running in local PC mode when TCP connection to the PC is lost. This is in order to recover from the situation where the IP address of the sensor may have changed. In order to reduce network traffic, many managed wireless networks have UDP broadcast traffic filtered by default which may inhibit the operation of the WiFi Devices. On Aruba managed networks this setting is called ‘Drop Broadcast and Multicast Traffic’.
My PC has multiple network connections, is this a problem?
When using the WiFi Sensors with the PC software, they must be on the same network in order to communicate. If the PC has multiple network connections e.g. wired and wireless, the WiFi Sensor Software may not be able to automatically select the correct network connection.
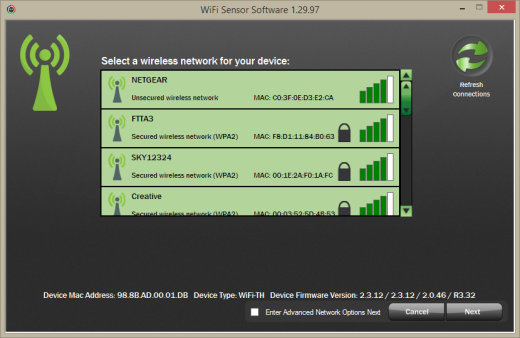
On the Wireless Network selection screen, click on the green antenna symbol on the top left of the window. This will cause a drop-down box to appear on the bottom left. Select the network adapter which corresponds to the same network as the WiFi Sensors. Then continue the setup as normal.
How do I configure my WiFi Sensors with a static IP Address?
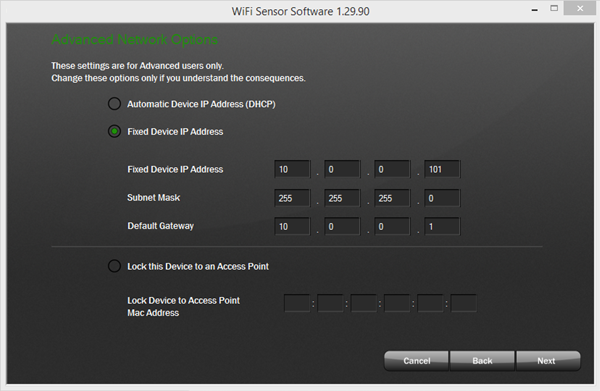
If you do not have a DHCP server on your network or wish to manually assign an IP address, these settings are found on the Advanced Network Options screen.

Ticking the box on the Wireless Network Selection screen then clicking ‘Next’ will take you to the advanced options.
Can I connect my WiFi Sensors to a wireless network with Enterprise Authentication?
Enterprise Authentication is supported on devices with System Firmware of 2.3.12 and above.
We support the following Authentication Methods:
- PEAP/MSCHAPv2
- FAST
- TTLS
Selecting an Enterprise network will prompt entry of a username and password:
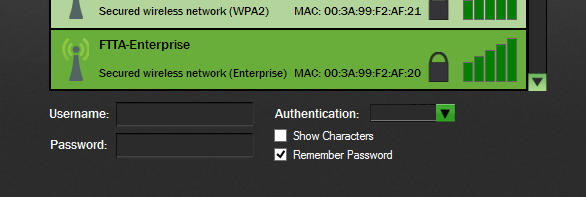
You also need to select the authentication type in the dropdown box. Consult your IT Administrator if you are unsure what type of enterprise network you have.
We do not support the following types which require a client certificate to be installed:
- TLS
- GTC
- LEAP
My Wireless Network doesn’t appear in the list, what could be causing this?
If you have refreshed the network list several times but your network does not appear, there are several possible causes:
The wireless network could be out of range of the sensor, try moving the sensor and the access point/router closer together and trying again.
The wireless network name (SSID) could be hidden. Either change the access point or router configuration to make the SSID visible or use the option to connect to Join Other Network and enter the details manually.

The SSID may contain invalid characters. The wifi sensors are unable to handle certain special characters such as spaces or commas in the SSID or trailing spaces at the end. You may need to change the SSID of the network. This also applies to passwords.
The wireless network may not have the correct modulation or data rates enabled. The WiFi sensors require 802.11b to be enabled.
I am getting an ‘Error Saving’ message at the end of the set-up process for my WiFi Sensor, what could be causing this?
At the end of the set-up process, the WiFi Sensors transmit a test message to the PC Software or to the Cloud in order to confirm that the configuration is correct. This error message most often due to the test connection failing.
Local PC
The most common reason for the test connection to fail is the packets being blocked by a firewall on your PC. Please follow our firewall configuration guides to ensure that you have the required ports open.
In order to communicate, the PC must be on the same network as the wireless device which the sensors are connected to. Another cause of the test connection failing can be if you have multiple network adapters on your PC, such as a wired and wireless connection or a USB 3G Modem connected. Please see the help section on multiple network adapters.
Cloud Service
When connecting a sensor to the Cloud, the message is transmitted across the internet to the Cloud Server. This requires the sensor to be able to access the internet via the wireless network on TCP Port 14354. Most domestic internet routers do not have restrictions on outbound TCP connections by default. Users on corporate networks may need to contact their IT Administrator to ensure that TCP Port 14354 is open for outbound traffic.
I have multiple access points with the same name (SSID), could this cause problems with the WiFi Sensors?
Devices with System Firmware of 2.3.12 or above are capable of selecting the strongest access point with the SSID it is configured to use. If you are moving a sensor between the coverage of two access points, it may lose connection temporarily with the PC software or the Cloud while it finds the new access point.
Devices with previous versions of the System Firmware will chose the Access Point with the lowest channel number. If you have multiple Access Points with the same SSID and are experiencing issues with a device showing a low signal strength despite being close to an access point it may be trying to connect to one further away. In order to work around this issue it is possible to lock a WiFi Sensor to the MAC Address of an Access Point. This option is found on the Advance Network Configuration screen.
Ticking the box on the Wireless Network Selection screen then clicking ‘Next’ will take you to the advanced options.

Enter the MAC Address of the access point you want to lock the sensor to.
There is an Enterprise Level Firewall (eg Sonicwall, Fortigate) on our network, will this stop the WiFi Sensors working on the Cloud?
The answer to this depends very much on the configuration of the Firewall. If the Firewall is configured to allow unrestricted outbound traffic, it should not cause any issues.
Some corporate firewalls are configured to only allow traffic from known or authenticated clients, eg using Windows Domain Login. As the WiFi Sensors are unable to respond to requests to identify themselves, the Firewall may not allow access through to the internet. In this case, an exception will need to be added for the IP or MAC Address of the WiFi Sensor. Please consult your IT Administrator.